Saturday, January 26, 2013

Project 14: Cast Resin Whale Stapler

The Cast Resin Whale Stapler is on Kickstarter until Feb 23. Get yours here!

http://www.kickstarter.com/projects/1748176346/whale-stapler


This stapler odyssey consumed my life for the last year.


My original plan was for a manufacturer to produce the whole thing so I could sit around all day collecting royalties and eating fancy cheese, but things weren't so simple.

First of all, I couldn't find a single stapler manufacturer still producing staplers in the United States of America!  Designing and manufacturing from scratch, or even contracting with someone to produce just the whale parts would have made no financial sense in quantities of less than 40 million or so. Aside from the cost, there shouldn't be more whale staplers than actual whales out there, for moral reasons.

And finally, I wanted to create something that looked and felt handmade.

First step was to order 400 internal stapler parts from a factory in Guangdong.


Chinese manufacturers are so easy to work with. They're solicitous, flexible, and unquestioning of dubious ideas. Here is part of the sales manager Joy's holiday greetings email: "Many thanks for your contiguous supports in the past years,  we wish both business snowballing in the coming years."


 The next step was to carve wooden whale parts that would fit the mechanism.


 Starting to look whale-like ...


Here is our kitchen table table chock-a-block with casting supplies. You can make anything.


The side of the smooth-on resin box promises "It Will Change Your Life!" It's true.


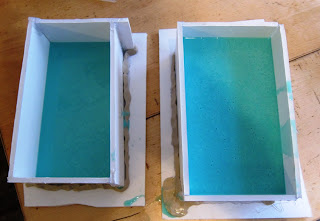
The bottom piece only required a simple one part mold.


The mold box is traditionally made out of foam board and hot glue, which is what I used here. But tradition is perdition. The hot glue gives off bad fumes and makes those annoying ribbons of glue that get stuck everywhere, while the foam board starts to rip after a few uses.

I've heard the best way to make moldmaking boxes is with legos, which allows for easy assembly and disassembly with no waste. And is also a great excuse to play with legos again. Unfortunately, normal lego bricks barely exist anymore, just this crap, so I didn't have time to find some for this project.

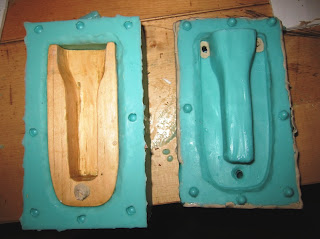
The top required a more complicated two part mold.


The cavity underneath the wood was filled in with clay and cap nuts were glued to the bottom of the box to create registers between the two halves.


This is when the rubber hits the mold ... 


Mold star! I really wanted to get the oomoo because it sounds so much like omoo, but the mold star is more durable and can survive more castings.  


I spent a whole day staring at this wondering what is going on in there. On the surface it looked kind of like an ocean, which was a good sign.


There was a whale down there!


 Setting the top of the two part mold (with pour spouts straws)


If you have a stupid idea, and then you produce a reverse of it, does that make it smart?

The resin  happens really fast so get ready! Just mix the Parts A (really toxic so don't be alive near it) and Part B (you can pour it on your cereal), pour the mixture into the mold and it sets before you  have a chance to stop and take pictures.


A perfectish replica!


After some sanding of the resin pieces, the stapler mechanism was attached with expoxy and plastic wood.  Warning: Plastic wood MUST be stored upside down, no matter how wrong it looks, or dire consequences will result.  How dire? Let's just say, did you ever wonder why the moon broke off from the earth in a cataclysmic explosion millennia ago? That was from protohumans failing to store their plastic wood upside down.


Just needs some paint and eyes, and ready for a night on the town.


Test staple .. Let's go!
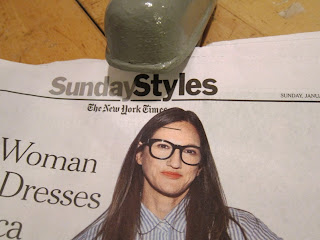


The heavy weight of the resin top makes the stapling experience smooth and easy.


Preparing for mass production, kitchen already looking like the firebombing of Dresden.


Sunday, August 26, 2012

Project 13: Fertility Beer Tap Handle


This was made for an ob/gyn and her man. Can you tell?


Started with a design that would be handle-shaped and structurally sound enough to withstand constant drunken yanking.  Also thought it would make sense to combine a semi-religious fertility icon with the alcohol dispensing mechanism that results in most conceptions these days.


Obvious place to start.


Around 3:30 am the prototype was done.  Left it on the kitchen table for Katy to inspect when she woke up a few hours later. 


The morning reviews. Katy knows by now that I require constant, unequivocal encouragement to avoid sinking into despair and disrepair. 


Bolstered by Katy and ready for prime time. 


First attempt (left) ended in disaster when late that night I carelessly cut too much above the head and didn't leave enough legroom. Had to take a deep breath, stroll around the chicken coop, and start over again (right). 


The coupler that I bought would have required a huge distended rear and abdomen.


Cutting it down allowed for a slimmer waist. This stage was really fun, except for all the metal dust that made breathing difficult. 


Worried soul even at a tender age.


7 or so layers of poly and polishing later.


Evolutionary retrospective. 


Time for a cold mug of amniotic fluid. 


Sunday, March 4, 2012

Project 12: Squid Lamp

You know those CNN "News of the Weird" stories about Japanese fishermen who haul up a tuna net and find there, entangled in the netting, some huge squid monster? It just goes to show you, they're out there ....


This is the best I could do on my point and click camera, I promise it looks more monstrous and imposing in person.


Started with a beautiful piece of wood from some folks up in northern Wisconsin who have a basswood forest behind their house. They make their living the old fashioned way - keep a stockpile of seasoned wood, cut it to order and ship UPS. That must be the life. The squid will never find them there.


The legs were really fun to shape - very tricky to keep them swirling in all the right directions.


Finding the right globe was a grueling task, involving antique store scouring, surreptitious inspection of fixtures when visiting other apartments, fruitless wandering through the lighting district, scores of search terms and thousands of web clicks. (To save you the trouble, this is the Lowe's Harbor Breeze).


Finished legs, looking squidlike. Unfortunately, I couldn't find an animal adjective for "squidlike." The problem with this language is that it's so hard to express ... anything!


Bioluminescing in the deep ocean.


Ensnaring a whale!


Monday, January 23, 2012

Project 11: Piranha Nail Clipper

Manicurist purists - don't you hate when your significant other falls behind with their toenail maintenance, and you think to yourself, "Man, if I just could get them to wade in a piranha infested amazonian tributary for just a few minutes, my problems would be solved." Well, here is the next best thing.


Originally I planned to put the fin lever on the top, but this fish looked better with an underbite, so I had to flip it. This project was a daily struggle between fidelity to the original design and the realities of trying to fit a nail clipper into a wooden fish.

I have so much more respect for nature now - not that nature ever did this.


This tail was the result of a concerted effort to coax more fluid shapes out of the wood.


Body cavity, ready for insertion of the nail clipper.


Studded with inlay pegs - should have just left them sticking out as is. There must be phalanxed fish like this in a deep sea trench somewhere. Also, wouldn't it be a good idea to put fish sticks in the Marinara Trench?


First time using Tung Oil. Smells great, all natural, has been used for thousands of years and doesn't coat your fingers in a fine layer of plastic the way polyurethane does. On the other hand, you have to patiently apply layer after layer to get a good finish - or you can just apply one or two layers and get distracted by more pressing concerns. Did tartar sauce actually originate in Crimea?


Wednesday, January 11, 2012

Project 10: Howler Monkey Light Switch Cover


I’ll have to post this here for now, until the sister blog Cast The Whales is up and running.


It all started with a feverish late night vision. As fast as possible, I reproduced the vision in Microsoft Paint, lest it be forgotten like the last 2000 pages of Kubla Khan.


What do YOU think about late at night?


I won’t recount every step that followed, there are not enough megabytes on the internet. Here are some of the highlights.


My original model, before I comprehended how impossible it would be to melt enough brass for a three dimensional head this size.


Half a head is better than none.


The inimitable and indispensable David Silva packing sand into the casting flask. I could never have done this project without him. He is a master of metal and fire.


Making the impression.


Melting down the brass. Yeah!


As cool as this looks … still not hot enough.


Once the brass casting grains turn into liquid metal straight out of a special effect from the early 90s, a quick pour and then you just hope.


Looking good ….


Great success!


And then there were two. This must be how god felt after he made Eve from Adam’s ribcage.


After a few days worth of compulsive grinding and polishing, it looked like this.


Making the background was harder than I expected. I wanted the look of metal accidentally spilled into the pumice stones, but it took a lot of practice before we could produce this effect deliberately. W.K. Kellogg probably had the same problem when he tried to replicate Corn Flakes.


Kids - DO NOT spend an afternoon splashing molten metal straight into pans of pumice stone. I promise, it’s really boring.


David brazed together the pieces of splash metal with silver solder, another difficult and lengthy step that I am almost completely eliding over.


I won’t even mention the polishing, pumice-stone removing, acid staining and whatnot that happened in post-production. Let’s just go straight to the pig picture.

Who has the cuter gorilla face???


Almost forgot. This is …. a …. uh … light switch cover.


Originally posted December 2011